
Bonus Light & Lasers Projects!
Thanks so much for joining me for the teleclass! On this page you'll find the videos for the experiments that we covered in class, plus a few extras. Enjoy!
Click Here to enroll in e-Science for the entire school year AND get all the free bonuses. Start using it today!
Enroll in the e-Science curriculum starting today, and going until April of 2018. Includes this eCamp 2017! Full money-back guarantee. Click here to check it out.

Refraction Using Lasers and Water
This simple activity has surprising results! We're going to bend light using plain water.
 Gummy Bears, Absorption, and Transmittance
We're going to make a durable cable car that can travel as long as you have string for it to move along! It's really a cool and simple project, and you can add cups or berry baskets below to transport cargo.
 Exploring Fluorescence Using a Laser
If you've ever wondered how glow in the dark toys stay bright even in the dark, this activity is just for you!
 Measure Your Hair Width Using a Laser
Do you have thick or thin hair? Let’s find out using a laser to measure the width of your hair and a little knowledge about diffraction properties of light.
 Laser Microscope
Did you know that you can use a laser to see tiny paramecia in pond water? We’re going to build a simple laser microscope that will shine through a single drop of water and project shadows on a wall or ceiling for us to study.
Refraction Using Lasers and Water
This simple activity has surprising results! We’re going to bend light using plain water. Light bends when it travels from one medium to another, like going from air to a window, or from a window to water. Each time it travels to a new medium, it bends, or refracts. When light refracts, it changes speed and wavelength, which means it also changes direction.
Materials:
- Red and green laser
- Paperclip
- Index card
- Tape
- Rubber band
- Water glass
- Open the paperclip into an “L” shape, and tape it to an index card so the card stands up. This is your projection screen.
- Use the rubber band to attach the laser pointers together. You’ll want them very close and parallel to each other. Place the rubber band close to the ON button so the laser will stay on when you put the rubber band over it.
- Place the laser pointers on a stack of books and put switch them on with the rubber band.
- Shine the lasers through the middle of an empty glass jar and onto the screen.
- Put a mark where the red and green laser dots are on the screen.
- With the lasers still on, slowly fill the container with water. What happened to the dots?
- You can add a couple of drops of milk or a tiny sprinkling of cornstarch to the water to see the beams in the water.
Here’s a quick activity you can do if the idea of refraction is new to you… Take a perfectly healthy pencil and place it in a clear glass of water. Did you notice how your pencil is suddenly broken? What happened? Is it defective? Optical illusion? Can you move your head around the glass in all directions and find the spot where the pencil gets fixed? Where do you need to look to see it broken?
When light travels from water to air, it bends. The amount it bends is measured by scientists and called the index of refraction, and it depends on the optical density of the material. The more dense the water, the slower the light moves, and the greater the light gets bent. What do you think will happen if you use cooking oil instead of water?
So the idea is that light can change speeds, and depending on if the light is going from a lighter to an optically denser material (or vice versa), it will bend different amounts. Glass is optically denser than water, which is denser than air. Here’s a couple of values for you to think about:
Vacuum 1.0000
Air 1.0003
Ice 1.3100
Water 1.3333
Pyrex 1.4740
Cooking Oil 1.4740
Diamond 2.4170
This means if you place a Pyrex container inside a beaker of vegetable oil, it will disappear, because it’s got the same index of refraction! This also works for some mineral oils and Karo syrup. Note however that the optical densities of liquids vary with temperature and concentration, and manufacturers are not perfectly consistent when they whip up a batch of this stuff, so some adjustments are needed.
Questions to Ask
- Is there a viewing angle that makes the pencil whole?
- Can we see light waves?
- Why did the green and red laser dots move?
- What happens if you use an optically denser material, like oil?
Gummy Bears, Absorption, and Transmittance
Gummy bears are a great way to bust one of the common misconceptions about light reflection. The misconception is this: most students think that color is a property of matter, for example if I place shiny red apple of a sheet of paper in the sun, you’ll see a red glow on the paper around the apple.
Where did the red light come from? Did the apple add color to the otherwise clear sunlight? No. That’s the problem. Well, actually that’s the idea that leads to big problems later on down the road. So let’s get this idea straightened out.
Materials:
- Flashlight
- Lasers
- Red and green gummy bear
Download your student worksheet here! This download is provided by Laser Classroom. Check out their website for more free downloads and really cool lasers!
It’s really hard to understand that when you see a red apple, what’s really happening is that most of the wavelengths that make up white light (the rainbow, remember?) are absorbed by the apple, and only the red one is reflected. That’s why the apple is red.
When the light hits something, it gets absorbed and either converted to heat, reflected back like on a mirror, or transmitted through like through a window.
When you shine your flashlight light through the red gummy bear, the red gummy is acting like a filter and only allowing red light to pass through, and it absorbs all the other colors. The light coming from out the back end of the gummy bear is monochromatic, but it’s not coherent, not all lined up or in synch with each other. What happens if you shine your flashlight through a green gummy bear? Which color is being absorbed or not absorbed now?
 Now remember, the gummy bear does NOT color the light, since white light is made up of all visible colors, red and green light were already in there. The red gummy bear only let red through and absorbed the rest. The green gummy bear let green through and absorbed the rest.
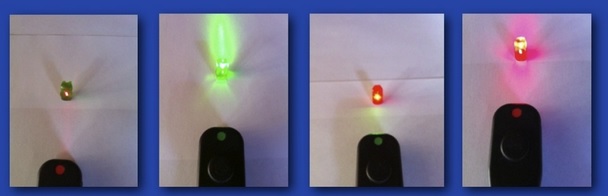
Now…take out your laser. There’s only one color in your laser, right? Shine your laser at your gummy bears. Which gummy bear blocks the light, and which lets it pass through? Why is that? I’ll give you one minute to experiment with your gummy bears and your lasers.
In the image above, the two on the left are green gummy bears, and the two on the right are red gummy bears. The black thing is a laser. The dot on the black laser tells you what color the laser light is, so the laser on the far left is a red laser shining on a green gummy bear. Do you see how the light is really visible out the back end of the gummy bear in only two of the pictures? What does that tell you about light and how it gets transmitted through an object?
Exploring Fluorescence using a Laser
If you’ve ever wondered how glow in the dark toys stay bright even in the dark, this activity is just for you! When light hits a material, it’s either reflected, transmitted, or absorbed as we discovered with the gummy bear activity earlier. However, certain materials will absorb one wavelength and emit an entirely different wavelength, and when this happens it’s called “fluorescence”. Let’s do an experiment first, and then we’ll go over why it does what it does.
Materials
- Laser (green)
- Highlighter (pink or orange)
- Diffraction grating
- White paper
- Point your laser at the wall, making a bright green dot. (Red lasers won’t work with this experiment.)
- Look at the dot through the diffraction grating. What do you see? How many different colors are there? (If you don’t have a diffraction grating, then simply shine your laser onto a CD and look at the reflected beams.)
We’ll do more on diffraction another time, but just note that a diffraction grating is made up of a lot of tiny prisms that un-mix light into its different colors. That’s why you see several different dots coming from the laser when you pass it through the diffraction grating. If you look at a candle flame through a diffraction grating, you’ll see a whole rainbow, since the white light from a candle is made up of the rainbow. (Image below is a laser through a diffraction grating.) A laser is one color, monochromatic , so you should expect to see only one color through the diffraction grating.
Now let’s try something else…
- On your white sheet of paper, color an area with your marker.
- Hold the paper against the wall. You can tape it into place if that makes it easier.
- Turn off the lights and point a green laser at the highlighter area you colored in.
- Look at the dot next to the main dot through the diffraction grating.
- Do you see more than one color now? Whoa!
This is a fantastic experiment because it gives you totally unexpected results! Where did the colors come from when you shined your laser on the highlighter area? And why weren’t they present when you just used a plain white wall?
It has to do with something called fluorescence. When the green laser hits the orange square, the electrons are excited by the laser and jump up to a higher energy state, and then relax back down. When they relax down, they release photons (light particles) that are made up of several different wavelengths. The diffraction grating makes it possible to see those wavelengths individually as a spectrum.
Measure Your Hair Width Using a Laser
Do you have thick or thin hair? Let’s find out using a laser to measure the width of your hair and a little knowledge about diffraction properties of light. (Since were using lasers, make sure you’re not pointing a laser at anyone, any animal, or at a reflective surface.)
Light is also called “electromagnetic radiation”, and it can move through space as a wave, which makes it possible for light to interact in surprising ways through interference and diffraction. This is especially amazing to watch when we use a concentrated beam of light, like a laser.
If we shine a flashlight on the wall, you’ll see the flashlight doesn’t light up the wall evenly. In fact, you’ll probably see lots of light with a scattering of dark spots, showing some parts of the wall more illuminated than the rest. What happens if you shine a laser on the wall? You’ll see a single dot on the wall.
In this experiment, we used a laser to discover how interference and diffraction work. We can use diffraction to accurately measure very small objects, like the spacing between tracks on a CD, the size of bacteria, and also the thickness of human hair.
Here’s what you need:
- a strand of hair
- laser pointer
- tape
- calculator
- ruler
- paper
- clothespin
WARNING! The beam of laser pointers is so concentrated that it can cause real damage to your retina if you look into the beam either directly or by reflection from a shiny object. Do NOT shine them at others or yourself.
- Tape the hair across the open end of the laser pointer (the side where the beam emits from)
- Measure 1 meter (3.28 feet) from the wall and put your laser right at the 1 meter mark.
- Clip the clothespin onto the laser so that it keeps the laser on.
- Where the mark shows up on the wall, tape a sheet of paper.
- Mark on the sheet of paper the distance between the first two black lines on either side of the center of the beam.
- Use your ruler to measure (in centimeters) to measure the distance between the two marks you made on the paper. Convert your number from centimeters to meters (For me, 8 cm = 0.08 meters.)
- Read the wavelength from your laser and write it down. It will be in “nm” for nanometers. My laser was 650 nm, which means 0.000 000 650 meters.
- Calculate the hair width by multiplying the laser wavelength by the distance to the wall (1 meter), and divide that number by the distance between the dark lines. Multiply your answer by 2 to get your final answer. Here’s the equation:
Hair width = [(Laser Wavelength) x (Distance to Wall)] / [ (Distance between dark lines) x 0.5 ] In the video:
- wavelength was 650 nm = 0.000 000 650 meters
- distance from the wall was 1 meter
- the distance between the dark lines was 8 cm = 0.08 m
Using a calculator, this gives a hair width of 0.000 0162 5meters, or 16.25 micrometers (or 0.000 629 921 26 inches). Now you try!
Laser Microscope
By shining a laser though a drop of water, we can see the shadows of objects inside the water. It’s like playing shadow puppets, only we’re using a highly concentrated laser beam instead of a flashlight.
If you’re wondering how a narrow laser beam spreads out to cover a wall, it has to do with the shape of the water droplet. Water has surface tension, which makes the water want to curl into a ball shape. But because water’s heavy, the ball stretches a little. This makes the water a tear-drop shape, which makes it act like a convex lens, which magnifies the light and spreads it out.
Materials:
- red or green laser (watch video for laser tips)
- large paperclip
- rubber band
- stack of books
- white wall
- pond water sample (or make your own from a cup of water with dead grass that’s been sitting for a week on the windowsill)