
Light & Lasers Experiments
Learn about the fascinating world of light by using lasers and easy to find materials from around the house!
This set of science experiments will show you the properties of light, including optics, diffraction, transmission, reflection, wavelength, intensity, and so much more. You’ll discover how light travels in a straight line, how light can turn a corner, split into several beams, and why objects can appear dark even when light is shining right on them. And if you’ve ever wondered why you just can’t just shine a flashlight through a lens and call it a laser, these experiments will show you exactly why that is… it has to do with the way a laser generates light in the first place.
Tech Lab Experiments
Measuring Laser Wavelength
What is a laser?
Gummy Bears and Lasers
Laser Collimation
Reflection Law
Laser Coherence

Laser Safety

Tech Light Lab Experiments
This set of experiments will show you the properties of light, including optics, diffraction, transmission, reflection, wavelength, intensity, and so much more. You’ll discover how light travels in a straight line, how light can turn a corner, split into several beams, and why objects can appear dark even when light is shining right on them.
Materials: You can order all the hard to find stuff in one kit called the Tech Light Lab!
- three flashlights
- fingernail polish (red, blue, and green)
- clear tape
- small mirror
- paperclip
- old CD or diffraction grating
- clear pieces to shine your light through
- protractor
- pencil
- ruler
- index cards (3)
- paper
- three objects: one red, one blue, and one green
- aluminum foil
- tack
- water glass
- binder clip (optional)
This is a longer video that has several experiments on it. I left them all together in one long video, as the experiments build on each other, and this set is best done all together. You should be able to complete all of the experiments in about 35-45 minutes. Here are the experiments in the video:
- Diffraction Gratings
- Does Light Travel in a Straight Line?
- Exploring Shadows
- Reflecting Light
- Bouncing Light
- Adding Light
- Bending Light
- Refraction
What is a Laser?
Have you ever wondered why you just can’t just shine a flashlight through a lens and call it a laser? It’s because of the way a laser generates light in the first place.The word LASER is an acronym for Light Amplification by Stimulated Emission of Radiation. Let’s do an experiment that shows you how a laser is different from light from a flashlight by looking at the wavelengths that make up the light.
Materials:
- flashlight
- laser
- diffraction grating or old CD
- clear tape
- red, green, and/or blue fingernail polish
This download is provided by Laser Classroom. Check out their website for more free downloads and really cool lasers!
Lasers are optical light that is amplified, which means that you start with a single particle of light (called a photon) and you end up with a lot more than one after the laser process.
Stimulated emission means that the atom you’re working with, which normally hangs out at lower energy levels, gets excited by the extra energy you’re pumping in, so the electrons jump into a higher energy level. When a photon interacts with this atom, if the photon as the same exact energy as the jump the electron made to get to the higher level, the photon will cause the electron to jump back down to the lower level and simultaneously give off a photon in the same exact color of the photon that hit the atom in the first place.
The end result is that you have photons that are the same color (monochromatic) and in synch with each other. This is different from how a light bulb creates light, which generates photons that are scattered, multi-colored, and out of phase. The difference is how the light was generated in the first place.
Radiation refers to the incoming photon. It’s a word that has a bad connotation to it (people tend to think all radiation is dangerous, when really it’s only a small percentage that is). So in this case, it just means light in the laser. The incoming photon radiation that starts the process of stimulated emission (when the electron jumps between energy levels and generates another photon), and the light amplification means that you started with one photon, and you ended up with two. Put it all together and you have a LASER!
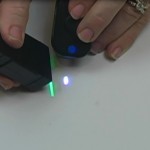
Laser Collimation
Laser light is collimated, meaning that it travels in parallel rays. Here’s a really cool experiment that will show you the difference between a non-collimated light, like from a flashlight and collimated light from a laser.
Materials
- flashlight
- laser
- ruler
- pencil
- piece of paper
Ordinary light from a light bulb diverges as it travels. It spreads out and covers a larger and larger area the further out you go. A laser has little to no divergence, so we way that laser light is collimated.
Laser Coherence
Lasers light is different from light from a flashlight in a couple of different ways. Laser light is monochromatic, meaning that it’s only one color. Laser light is also coherent, which means that the light is all in synch with each other, like soldiers marching in step together. Here’s a really neat experiment that shows you how to tell if a light source is generating coherent light.
Materials
- laser
- flashlight
This download is provided by Laser Classroom. Check out their website for more free downloads and really cool lasers!
Laser light is coherent, which means that all the light waves peaks and valleys line up. The dark areas are destructive interference, where the waves cancel each other out. The areas of brightness are constructive interference, where the light adds, or amplifies together. LED light is not coherent because the light waves are not in phase.
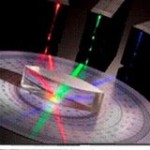
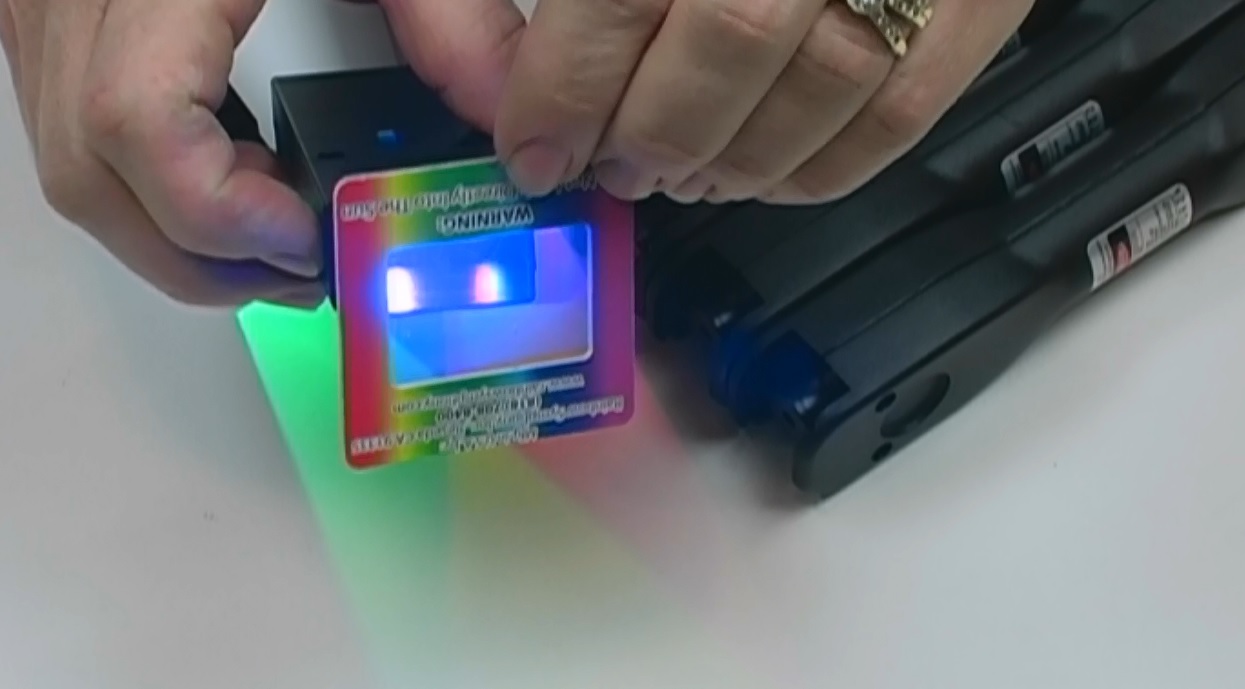
Measuring the Wavelength of a Laser
Diffraction is how light bends as it passes through very narrow slits or around very thin objects like a hair. When light travels around a hair, two wave patterns form, and those waves interfere with each other constructively (they add together to form a bright region) or destructively (the cancel each other out and leave a dark spot).
This experiment looks at the light and dark areas of interference to determine the wavelength of a laser. You can do this for lasers that don’t have labels on them, so you really don’t know what wavelength they are!
Materials
- laser
- diffraction grating
- calculator
- blank wall
- ruler/yardstick
This download is provided by Laser Classroom. Check out their website for more free downloads and really cool lasers!
The math for figuring this out is easy. You first need to know the distance between the slits (d) and how far apart the two maximums are as shown in the video (X), and multiply those two together. If you make your diffraction grating 1 meter from the wall, you divide your product by 1 meter to get your wavelength. Watch your units or you’ll be way off in your calculations!
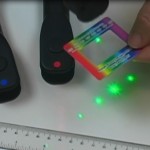
Gummy Bears, Absorption, and Transmittance
Gummy bears are a great way to bust one of the common misconceptions about light reflection. The misconception is this: most students think that color is a property of matter, for example if I place shiny red apple of a sheet of paper in the sun, you’ll see a red glow on the paper around the apple. Where did the red light come from? Did the apple add color to the otherwise clear sunlight? No. That’s the problem. Well, actually that’s the idea that leads to big problems later on down the road. So let’s get this idea straightened out.
Materials
- flashlight
- laser
- red and green gummy bear
This download is provided by Laser Classroom. Check out their website for more free downloads and really cool lasers!
It’s really hard to understand that when you see a red apple, what’s really happening is that most of the wavelengths that make up white light (the rainbow, remember?) are absorbed by the apple, and only the red one is reflected. That’s why the apple is red.
When the light hits something, it gets absorbed and either converted to heat, reflected back like on a mirror, or transmitted through like through a window.
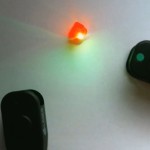
When you shine your flashlight light through the red gummy bear, the red gummy is acting like a filter and only allowing red light to pass through, and it absorbs all the other colors. The light coming from out the back end of the gummy bear is monochromatic, but it’s not coherent, not all lined up or in synch with each other. What happens if you shine your flashlight through a green gummy bear? Which color is being absorbed or not absorbed now?
 Now remember, the gummy bear does NOT color the light, since white light is made up of all visible colors, red and green light were already in there. The red gummy bear only let red through and absorbed the rest. The green gummy bear let green through and absorbed the rest.
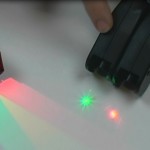
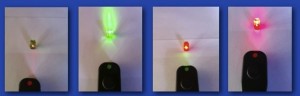
Now…take out your laser. There’s only one color in your laser, right? Shine your laser at your gummy bears. Which gummy bear blocks the light, and which lets it pass through? Why is that? I’ll give you one minute to experiment with your gummy bears and your lasers.
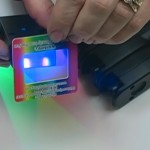
In the image above, the two on the left are green gummy bears, and the two on the right are red gummy bears. The black thing is a laser. The dot on the black laser tells you what color the laser light is, so the laser on the far left is a red laser shining on a green gummy bear. Do you see how the light is really visible out the back end of the gummy bear in only two of the pictures? What does that tell you about light and how it gets transmitted through an object?
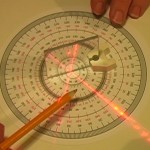
Law of Reflection using a Laser
The angle that the reflected light makes with a line perpendicular to to the mirror is always equal to the angle of the incident ray for a plane (2-dimentional) surface. We’re going to play with how light reflects off surfaces. At what angle does the light get reflected? This experiment will show you how to measure it.
Materials
- laser
- mirror
- protractor
- pencil
- paper
These downloads are provided by Laser Classroom. Check out their website for more free downloads and really cool lasers!
Download your student worksheet here!
Did you notice a pattern? When the laser beam hits the mirror at a 30o angle, it comes off the mirror at 60o, which means that the angle on both sides of a line perpendicular to the mirror are equal. That’s the law of reflection on a plane surface.
Laser Safety
Most people know not to shine lasers into sensitive places like eyeballs, but very few people can tell one laser from another. The truth is that not ALL lasers are dangerous, and there are different classifications of lasers. The most important information you need about laser safety is printed right on the laser itself.
Basic Laser Guidelines for Safety:
1. Never look directly at the beam source, or aperture
2. Never point the beam at another person
3. Always be mindful of where a “bouncing beam” will land due to reflection
This download is provided by Laser Classroom. Check out their website for more free downloads and really cool lasers!
How do you enforce safety? After kids are familiar with laser classification (below), let them know that if you spot any dangerous activity around using a laser, the laser is yours (the adult) to keep forever. Period.
Laser Classification
Class 1 or Class I lasers do not emit hazardous levels of optical radiation. You’ll find theses types of lasers in the scanners of grocery stores at the check out counter. The beam paths and reflections are all enclosed.
Class 2 or Class II lasers are low-power visible lasers around 1 mW (milliwatt), and you’d really have to try hard to get injured by one of these types of lasers. Officially, it’s stated that this type of laser can have possible eye damage if you stare at the beam directly without blinking for at least 15 minutes.
Class 3 has two different levels of lasers, one being much more dangerous than the other.
Class 3a or IIIa lasers are 1 to 5 mW power and can’t injure you normally, but if you stare at the beam through something with lenses, like binoculars, then your eyes are toast.
Class 3b or IIIb lasers are lasers from 5mW to 500 mW, and these are the ones that cause eye injury with you look at them without any eye protection. These are NOT the ones you want kids playing with, as eye protection is always required when around these lasers.
Class 4 or IV are above 500 mW and these require not only eye protection to be around, but also skin protection. These lasers cause damage by the beam and the reflections of the beam, and are also a fire hazard.
If you like this lesson, I'd like to send you a DVD with 10 more for just $7.
Click the button below to get the full scoop!